There's something truly magical about cute, whimsical cookies, and these chocolatey delights fit the bill perfectly. The Chocolate Mushroom Sugar Cookies Recipe brings together a rich chocolate flavor with an adorable mushroom design that feels just right for cozy afternoons and festive gatherings.

Jump to:
Why You'll Love This Recipe
This recipe is one of my favorites because it combines rich chocolate and sugar cookie goodness in a playful design that's surprisingly easy to pull off. You get thick, soft cookies with that perfect balance of sweet and cocoa, plus the charming mushroom look adds a special touch that always impresses.
- Delightfully cute presentation: The mushroom design makes these cookies perfect for parties or gifting, adding an extra wow factor.
- Satisfyingly soft texture: Thick and tender sugar cookies with a chocolate twist that melt in your mouth.
- Convenience of slice-and-bake: You can prep the dough ahead and bake fresh cookies anytime, cutting down last-minute stress.
- Versatile and customizable: I love how easy it is to tweak food coloring or decorating options to celebrate different seasons or moods.
Ingredients & Why They Work
Each ingredient in the Chocolate Mushroom Sugar Cookies Recipe is key to getting that perfect balance of flavor, texture, and that cute design you’ll love showing off. Here’s why I like these particular choices and some tips on what to look for when shopping.

- Butter: Using butter that’s barely softened—not too soft—gives the dough structure and richness without becoming greasy.
- Granulated Sugar: Adds sweetness and helps create that classic sugar cookie crunch on the edges.
- Salt: Just a pinch enhances the chocolate flavor and balances the sweetness perfectly.
- Vanilla Extract: Gives depth to the flavor, making the chocolate pop and rounding out the cookie’s sweetness.
- Egg: Binds all the ingredients together and helps keep the cookies soft and tender.
- All-Purpose Flour: The base for the dough, giving it just enough structure to hold its shape without being tough.
- Dutch Processed Cocoa Powder: This cocoa has a smooth, rich chocolate flavor that complements the sweetness beautifully and adds that lovely deep color.
- Red Gel Food Coloring: Concentrated for vibrant color on the mushroom caps, and it won’t thin out the dough like liquid colorings might.
- White Round Pearl Sprinkles: These make adorable mushroom spots and add a touch of texture and charm.
- Coarse Sugar: Perfect for sprinkling on the edges to add sparkle and a pleasant crunch.
- Powdered Sugar & Heavy Cream: Combined to create a smooth, slightly thick frosting to help decorate the stems—and with green gel food coloring, it brings those little mushroom stems to life!
Make It Your Way
I like to switch up the colors depending on the season or mood, and have even tried variations that use different colored sprinkles for a playful twist. The best part about this Chocolate Mushroom Sugar Cookies Recipe is how easy it is to make it your own.
- Variation: Once, I swapped red gel coloring for bright orange and yellow to make autumn-inspired mushrooms—it was perfect for a harvest party!
- Dietary tweak: I haven’t tried a gluten-free version yet, but swapping the flour for a blend made for sugar cookies could be a good start.
Step-by-Step: How I Make Chocolate Mushroom Sugar Cookies Recipe

Step 1: Creaming and Combining the Basics
Start by creaming the butter and granulated sugar until it’s light and fluffy—this is where air gets incorporated for a soft cookie. Since I like those rich chocolate notes, I add the salt, vanilla, and the egg next, mixing well before sifting in the flour and cocoa powder. Make sure your egg is at room temperature to avoid curdling or lumps.
Step 2: Color and Shape Your Dough
This step gets fun! Divide your dough to add the red gel coloring for the mushroom caps, keeping some dough plain chocolate for the edges. Roll out and assemble the dough as a log so that when sliced, each cookie reveals that iconic mushroom shape. This slice-and-bake method makes the whole process convenient and even kind of meditative.
Step 3: Decorate Before Baking
Sprinkle the white round pearl sprinkles on the red dough where the mushroom spots should be, and press them in gently so they don't fall off in the oven. Coarse sugar along the edges adds just the right sparkle and texture. This attention to detail makes your cookies look almost professionally made—your kitchen will smell amazing too.
Step 4: Bake and Prepare the 'Stem' Icing
Bake your cookies at 350°F (175°C) for about 10 minutes—watch closely so they stay soft and don’t overbrown. While they bake, mix powdered sugar, heavy cream, and green gel coloring to make that charming green stem frosting. When the cookies finish cooling, pipe on the green stem, and voilà—the perfect mushroom cookie!
Top Tip
After baking these cookies a bunch of times, I’ve picked up a few tricks that really make a difference in how easy and satisfying the process becomes.
- Butter Consistency: Don’t let your butter get too soft or melted before mixing—it changes the dough texture and makes rolling a hassle.
- Food Coloring Choice: Gel food coloring is a must here; it delivers bold color without making the dough sticky or runny.
- Slice Thickness: Aim for uniform slices about ¼ to ⅓ inch thick—too thin and they’ll lose shape, too thick and they bake unevenly.
- Cooling Before Icing: Always let cookies cool fully on a wire rack before adding frosting—otherwise it melts and loses that neat look.
How to Serve Chocolate Mushroom Sugar Cookies Recipe

Garnishes
I like to keep the garnishes simple to highlight the mushroom look. White pearl sprinkles are my go-to for those cute “spots,” and a light dusting of coarse sugar along the edges gives them a little sparkle that catches the eye and adds a fun crunch.
Side Dishes
These cookies pair perfectly with a cozy drink—like a warm cup of chai tea, hot chocolate, or even a fresh latte. I’ve also served them alongside a simple fruit platter for a balanced snack at a cozy get-together.
Creative Ways to Present
For holidays or special occasions, I arrange these cookies nestled in a bed of fresh moss or pine branches to play up their woodland vibe. Stacking them on a rustic wooden board or tying handfuls with twine makes for charming gifts or centerpieces that guests always ask about.
Make Ahead and Storage
Storing Leftovers
I keep leftover cookies in an airtight container at room temperature. They stay soft for about 3 days, but honestly, they rarely last that long! Adding a slice of bread in the container helps keep them moist longer.
Freezing
The dough itself freezes beautifully. I like to slice the dough log, separate slices with parchment paper, and freeze them in a container—then I bake fresh cookies straight from the freezer whenever the craving hits. This way, you always get that fresh-baked magic.
Reheating
To refresh leftover cookies, I pop them in a 300°F oven for 3–4 minutes. It tastes like they just came out of the oven and softens them up perfectly, especially if they’ve been stored a bit longer.
Frequently Asked Questions:
Dutch processed cocoa powder has a smoother flavor and darker color, which really brings out the richness in these cookies. Natural cocoa can work in a pinch but will make the cookies a bit more acidic and slightly lighter in color.
I gently press the pearl sprinkles into the red dough before baking to make sure they stick well. Avoid pushing too deep, or they’ll muddle the dough’s texture, but pressing them lightly helps them stay in place even as the cookies expand.
This recipe relies on butter and egg for its soft texture, so substituting these for vegan or dairy-free options can be tricky. However, you could experiment with plant-based butter and a flaxseed egg, though results may vary and the design might be more delicate.
Storing the cookies in an airtight container at room temperature with a slice of fresh bread helps keep moisture in and prevents them from hardening too quickly. Reheating gently in the oven also refreshes their softness if needed.
Final Thoughts
These Chocolate Mushroom Sugar Cookies Recipe aren’t just cookies—they’re mini works of edible art that bring warmth and whimsy to any table. I love making them when I want a baking project that feels special but stays manageable, and sharing them always lights up the room. Give them a try—you’ll find the process as delightful as the results!
Print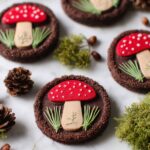
Chocolate Mushroom Sugar Cookies Recipe
- Prep Time: 20 minutes
- Cook Time: 10 minutes
- Total Time: 90 minutes
- Yield: 18 cookies
- Category: Dessert
- Method: Baking
- Cuisine: American
- Diet: Vegetarian
Description
Mushroom Sugar Cookies are thick, soft slice-and-bake cookies featuring a chocolate exterior and a charming mushroom design in the center. These cookies are easy to make, perfect for holiday baking or cottagecore-inspired treats, and can be conveniently frozen to bake fresh whenever desired.
Ingredients
Cookie Dough
- ¾ cup butter (barely softened - not too soft!)
- ¾ cup granulated sugar
- ¼ teaspoon salt
- 1 teaspoon vanilla extract
- 1 large egg (room temperature)
- 2 cups all-purpose flour (240g)
- 2 tablespoons cocoa powder (Dutch processed)
Decorations
- Red gel food coloring (as needed)
- White round pearl sprinkles
- ⅓ cup coarse sugar
- ½ cup powdered sugar
- 1-2 tablespoons heavy whipping cream
- Green gel food coloring (as needed)
Instructions
- Prepare the Dough: In a large bowl, cream together the butter and granulated sugar until light and fluffy. Add the salt, vanilla, and egg, mixing well to combine.
- Add Dry Ingredients: Sift together the all-purpose flour and cocoa powder. Gradually add the dry ingredients to the wet mixture, mixing just until combined to form a soft dough.
- Color and Divide Dough: Separate a small portion of the dough and tint it red with the gel food coloring for the mushroom caps. Leave some dough natural or tint with green for decorative details. Wrap each dough portion separately in plastic wrap.
- Assemble Mushroom Shapes: Shape the red dough into small mushroom caps and use white round pearl sprinkles to create spots. Use the coarse sugar to add texture as needed. Arrange the mushroom shapes on a log of chocolate dough to create a hidden mushroom design inside the cookie slices.
- Chill Dough: Wrap the assembled logs tightly and refrigerate or freeze for at least 1 hour to firm up the dough for slicing.
- Preheat Oven and Slice Dough: Preheat your oven to 350°F (175°C). Slice the chilled dough logs into ¼ inch thick rounds, carefully revealing the mushroom design.
- Bake Cookies: Place cookie slices on a baking sheet lined with parchment paper, spacing them 2 inches apart. Bake for 10 minutes or until the edges are set but the centers remain soft.
- Prepare Icing: While cookies cool, mix powdered sugar with heavy whipping cream and green gel food coloring to make a smooth icing for decorating stems or leaves if desired.
- Decorate Cookies: Once cooled, pipe the green icing onto cookies to add mushroom stems and leafy details.
- Store or Serve: Let decorated cookies set completely before serving. Store leftovers in an airtight container for up to one week or freeze for longer storage.
Notes
- Use room temperature egg and butter to ensure even mixing and soft dough.
- For vibrant colors, use gel food coloring sparingly and add more if needed.
- These cookies are slice-and-bake style, so chilling the dough is essential for clean slices and preserving the mushroom design.
- You can freeze the unbaked dough logs for up to 3 months; thaw before slicing and baking.
- Adjust the thickness of the slices for desired cookie size; thinner slices will result in crisper cookies.
- Decorate with edible pearl sprinkles to enhance the mushroom cap look.
- Experiment with different colored icing to create varied mushroom designs.
Nutrition
- Serving Size: 1 cookie
- Calories: 186 kcal
- Sugar: 15 g
- Sodium: 97 mg
- Fat: 8 g
- Saturated Fat: 5 g
- Unsaturated Fat: 2.4 g
- Trans Fat: 0.3 g
- Carbohydrates: 26 g
- Fiber: 1 g
- Protein: 2 g
- Cholesterol: 30 mg


Leave a Reply